Please don’t wash your chicken. All it does is spray bacteria all over your sink and every surface nearby. The oven heat is what kills the bad stuff. Pat it dry with paper towels instead — that’s the move.
And speaking of drying: moisture is literally your worst enemy here. That steam that builds up on wet skin? That’s what stops it from crisping. The more moisture you remove before it hits the oven, the more crackling, golden, shatter-when-you-cut-it skin you get. Be thorough. Get into the cavity too. Don’t rush it.
🧂 The Overnight Trick (Worth It, I Promise)
If you’ve got time to plan ahead — salt the chicken the night before, set it uncovered on a rack in the fridge, and leave it there for 12–24 hours. The salt pulls out moisture, brines the meat, and the cold fridge air dries out the skin like nothing else. The resulting crispiness is genuinely absurd. You’ll understand when you try it.
Also — pull the bird out of the fridge 20–30 minutes before it goes in the oven. A cold chicken in a hot oven cooks unevenly. This tiny step makes a real difference and costs you literally nothing.
IV · Butter Under the Skin Is Not Optional
Butter or olive oil? The answer is kind of both. Butter gives you that deep golden color and rich flavor because the milk solids caramelize as it roasts. Olive oil has a higher smoke point and no water content, which can actually produce a slightly crispier skin. Lots of great cooks use olive oil on the outside and herb butter underneath the skin — best of both worlds.
Yes, you need to get butter under the skin. Gently loosen the breast skin with your fingers (be gentle, don’t tear it), then push in softened butter mixed with garlic, thyme, rosemary, whatever you like. This bastes the breast meat from the inside as it cooks and keeps it impossibly juicy. Surface seasoning alone just doesn’t hit the same way.
Stuff the cavity with a halved lemon, some crushed garlic, and a few herb sprigs. It perfumes the meat from the inside as it roasts and honestly makes your kitchen smell incredible. Your neighbors might start hovering.
✨ The Weird Secret: Baking Powder
Add a tiny bit of baking powder to your salt rub — roughly a 3:1 ratio of salt to baking powder. It raises the skin’s pH level, speeds up browning, and creates these little crispy bubbles all over the surface. It’s the same technique used in Chinese roast duck and it is genuinely wild how well it works.
V · Start Hot, Finish Gentle — It’s That Simple
Crank your oven to 450°F (230°C) and roast at that temperature for the first 10–15 minutes. This is your skin-crisping window — the high heat kicks off browning fast. Then drop it to 350°F (175°C) and let it coast to the finish. The lower heat cooks the interior gently without torching the outside.
Instead of putting the chicken directly in the pan, make a little bed of rough-cut onion, carrot, and celery underneath it (or use a wire rack). Air circulates underneath, the bottom crisps up too, and those vegetables soak up all the gorgeous drippings and basically become the foundation for a legitimately incredible pan gravy. Do not skip this.
As for trussing (tying the legs together) — great if you want a pretty bird and more even cooking. But on a weeknight? Skip it. The flavor difference is minimal and you’ll save yourself five minutes of fiddling with kitchen twine.
VI · Stop Guessing, Get a Thermometer
Timing guides are basically lying to you — oven temperatures vary, bird sizes vary, starting temperatures vary. The only way to actually know your chicken is done is with a meat thermometer. It costs about ten dollars and it changes everything.
| Cut | Target Temp | Notes |
|---|---|---|
| 🍗 Breast | 165°F (74°C) | Safe and juicy — don’t go over |
| 🍖 Thigh | 175°F (79°C) | Connective tissue melts into silky gelatin |
Poke the probe into the thickest part of the thigh, away from the bone. Dark meat is way more forgiving and actually gets better at higher temps. Breast meat dries out fast past 165°F, so always check both.
On basting: it’s optional and you shouldn’t overdo it. Every time you open the oven, the temperature drops and your crispy skin dreams suffer a little. Two times max, in the final 20 minutes only.
VII · You Have to Wait. I Know. I’m Sorry.
The chicken comes out of the oven looking like an absolute masterpiece. The smell is intoxicating. Every instinct is telling you to carve it right now.
Don’t carve it right now.
Rest the chicken for at least 15 minutes — ideally 20 to 30. While it was roasting, all those lovely juices got pushed into the center of the meat. Slice immediately and they pour out onto your cutting board. Let it rest and they redistribute back through the whole bird. The difference is dramatic — not subtle, not marginal. Dramatically juicier. Make yourself a drink, you’ve earned it.
💡 Loose Foil Only!
If you tent it with foil while it rests, keep it loose. Wrapping it tight traps steam — the very enemy of crispy skin — and will undo 20 minutes of careful oven work in 5 minutes of resting. A light drape, not a sealed package.
VIII · Troubleshooting: The Things Everyone Wonders About
Q: Help, the skin is turning brown way too fast — what do I do? Relax! Just drape a loose piece of foil over the top and keep roasting. The already-crisped skin is protected and the heat keeps doing its thing inside. Pull the foil off for the last 10 minutes to let it get its color back.
Q: Can I use my Dutch oven for this? Yeah! Dutch ovens are great for keeping chicken juicy. The catch: leave the lid OFF the whole time. With the lid on, you’re basically braising it — tender meat but zero crispy skin. Lid off = roast chicken. Lid on = braised chicken. Both delicious, different vibe.
Q: Should I cover it with foil for the whole roast? Nope. Keeping it uncovered is the entire point — that’s how you get the golden skin. Only use foil if it’s browning too aggressively, and even then, remove it for the final stretch.
Q: What do I do with the drippings in the pan? Oh you absolutely make pan gravy. Roasting pan on the stovetop over medium heat, splash of white wine or chicken stock, scrape up all the caramelized good stuff. Whisk in a teaspoon of flour if you want it thicker. Season, strain, done. Five minutes and it is incredible.
Q: What do I do with all the leftover chicken? This is genuinely one of the best things about roasting a whole bird. The leftover meat is perfect for a creamy chicken recipe for chicken alfredo the next night, shredded into noodle soup, or thrown on top of a Cobb salad. You cooked once and you’ve basically got two or three meals.
IX · Serve It, Stretch It, Waste Nothing
A beautiful roast chicken deserves a good supporting cast. Here are three sides that always work:
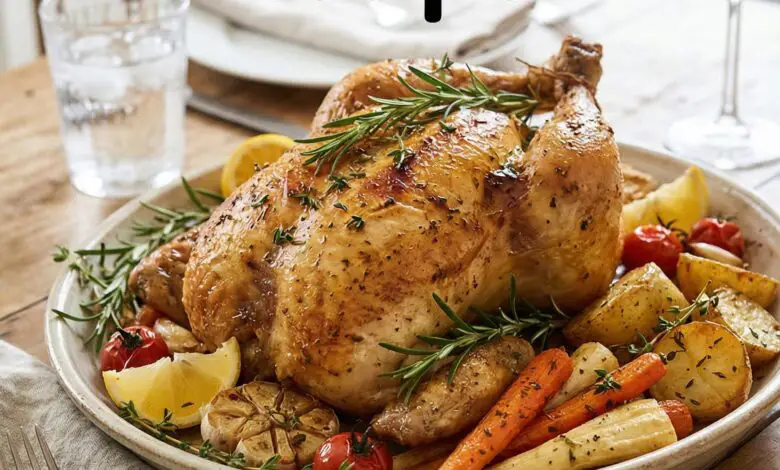
🥕 Roasted Root Vegetables Throw carrots, parsnips, and fingerling potatoes in the same pan. They’ll soak up all the drippings and basically cook themselves alongside the bird.
🥔 Creamy Mashed Potatoes Buttery, cloud-soft mashed potatoes with that pan gravy poured on top. A classic that will never let you down.
🥗 Mediterranean Salad Cucumber, tomato, olives, feta, lemon dressing. Cuts right through all that rich, roasty goodness.
The leftover life of a roast chicken is genuinely fantastic. Strip the carcass the next day and the meat goes into alfredo, pot pie, noodle soup — you name it. Then throw the bones into a pot with water, onion, celery, and bay leaves and simmer for a few hours. Boom — homemade stock that’ll make every soup and risotto you make for the next month taste like a restaurant made it. Total cost: basically zero.
🍲 Seriously Though, Don’t Toss Those Bones
The carcass makes the most incredible stock. Simmer with aromatics for 3–4 hours, or 1 hour in a pressure cooker. Freeze it in portions and your future self will thank you constantly.
Made with butter, good vibes, and way too much thyme.